Harmless car hack
Intro
If you’re driving a car you’ve probably seen the On-Board Diagnostics port (OBD for short) under the steering wheel. That is a standardized interface for accessing the vehicle’s diagnostic information. It’s typically used by mechanics and diagnostic tools to retrieve data related to the engine, transmission, and other essential systems. They usually use some manufacturer-approved hardware. What makes it interesting is that we can read data from almost any major device in the vehicle and even control some of them. Let’s go a bit deeper.
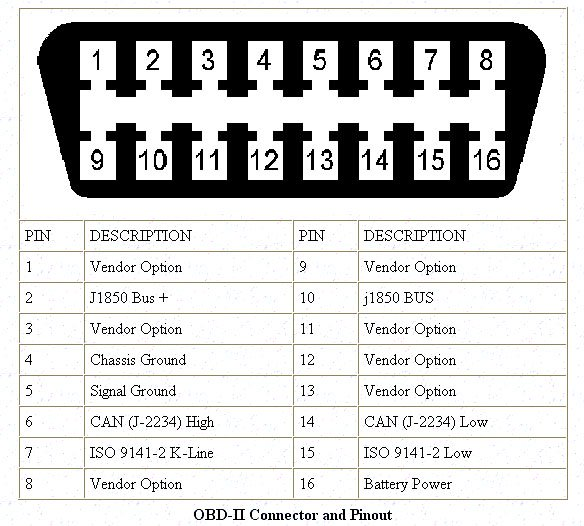
Here is pin-out of OBD-II port:

As you see, we have here two pins (6 and 14) for the differential CAN interface. It’s a bus, where any device (ECU - “electronic control units”) can send a message to all others. It’s particularly well-suited for real-time applications and is designed to operate in noisy electrical environments typical in vehicles. That thing is exactly what we need.
Btw, companies developing ADAS systems like comma.ai are using OBD’s CAN and some other CAN buses to talk to vehicle’s devices and control it. There is a whole open-source movement ran by them to reverse-engineer CAN messages for different cars and create DBC files that are used to run their openpilot.
Keep in mind, that for some real-time application it makes more sense to connect to the vehicle CAN bus directly, without using OBD port or any similar thing.
OBD communication 101
based on this cheat-sheet
Check the device connection (USB wire at my case)
After connecting the device, you can check messages produced by the device driver in the kernel ring buffer:
dmesg
[ 8603.743057] CAN device driver interface
[ 8603.748745] peak_usb 3-2:1.0: PEAK-System PCAN-USB adapter hwrev 28 serial
    FFFFFFFF (1 channel)
[ 8603.749554] peak_usb 3-2:1.0 can0: attached to PCAN-USB channel 0 (device
    255)
[ 8603.749664] usbcore: registered new interface driver peak_usb
Using ELM327 devices
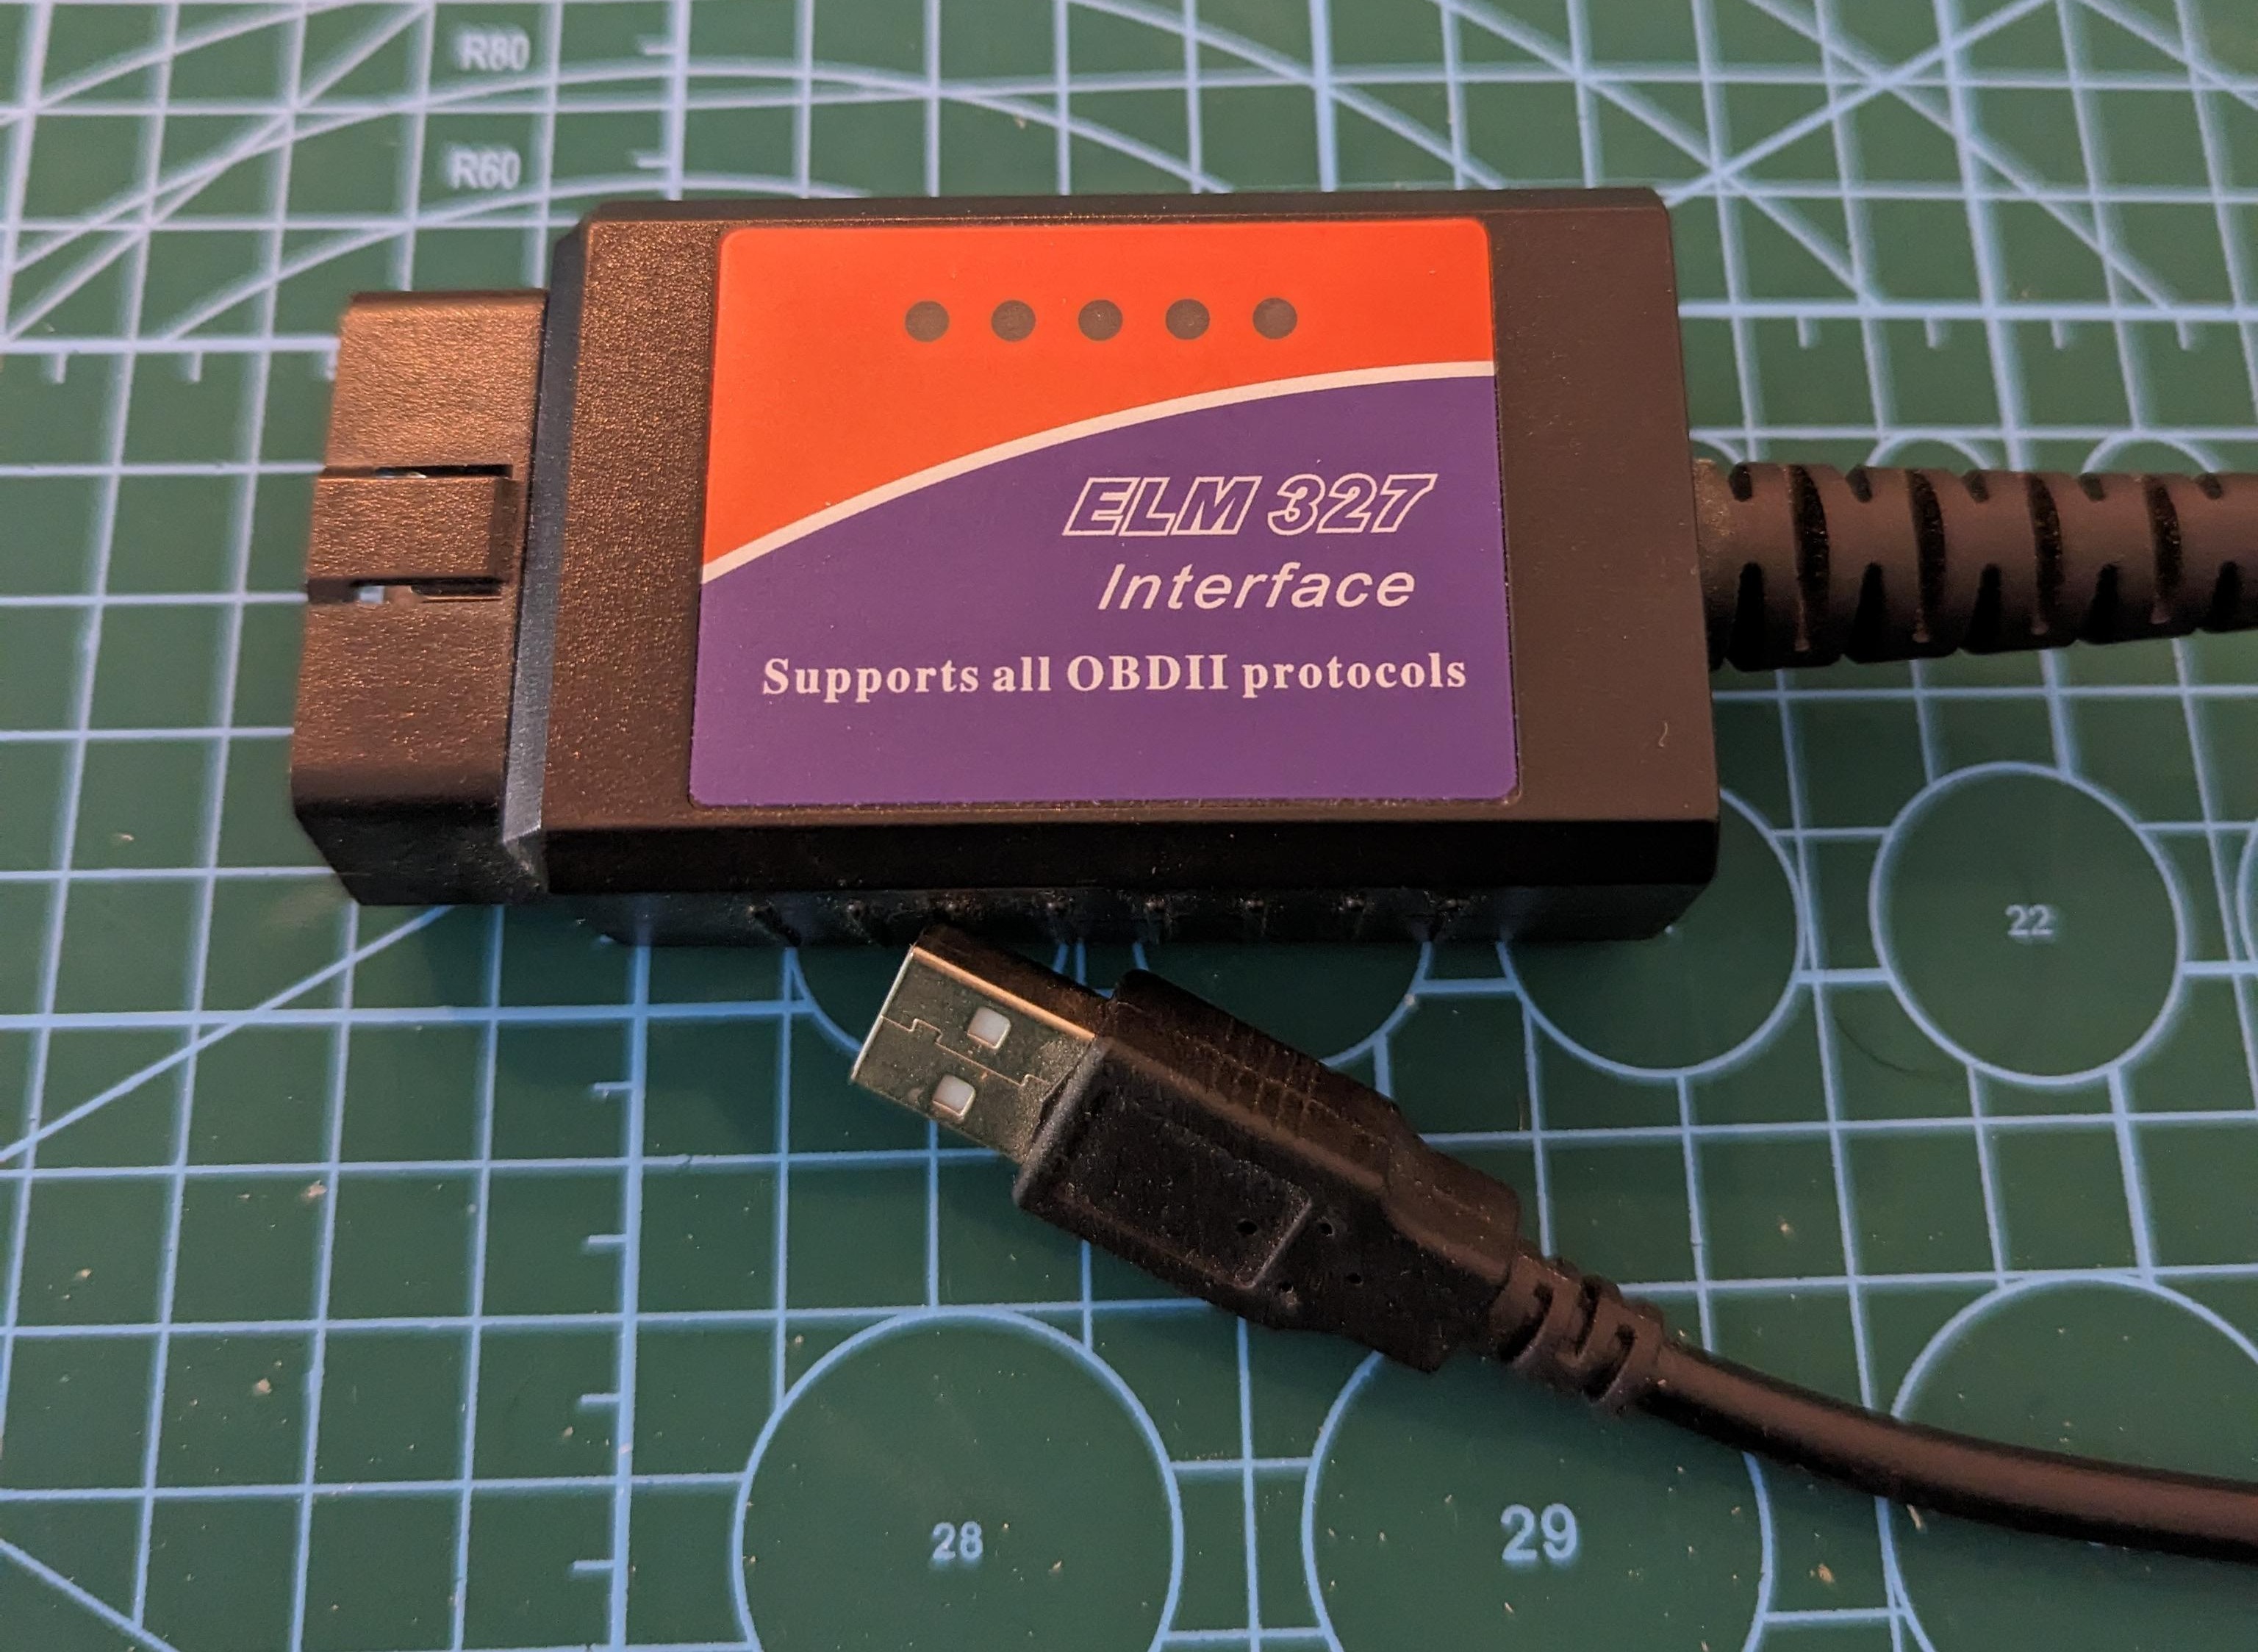
That’s basically a microcontroller which converts signals from a vehicle’s OBD-II port into the RS232 serial interface and in the end provides the USB interface, which makes it easy to read/write signals with your regular PC.

This is the cheapest solution to get some data from your vehicle’s ECUs.
The communication based on queries, which must be sent from “client” (your PC at this case) side to elm327 controller. Also this thing is slow. But it widely used, for example, to read status and identify errors from different devices in the car.
In order to get a “pure” CAN signals and be able to control the devices in your car - it’s better to get more expensive USB->CAN devices.
Anyway, install screen and enter the tty device session with a standart baud rate:
sudo apt install screen
sudo screen -L /dev/ttyUSB0 38400
Log file will be created at the current workdir.
And then you’re ready to send commands to the elm327, like this:
atz
// or
01 <PID>
See the Service 01 section for all needed PID codes and returned bytes decoding.
For example, here are queries for the engine RPM, vehicle speed and transmission actual gear:
01 0C
01 0D
01 A4
In case of RPM, we get two bytes, which must be converted as: (256*A + B) / 4 (A and B - decimals).
Speed encodes with one byte hex value, the decimal result will be in range 0…255, in km\h.
You can also get access to the CAN using the same PIDs, see the wiki article above for more info.
Remember, that the device version (from atz output) matters, since your elm327 may not support some communication protocols (another words - not all the cars and elm327 devices are compatible).
From pratice, it’s better to have v1.5 elm.
(Example OBD PIDs) Skoda Octavia A5 2011 actual OBD PIDs
Supported protocol: ISO 14230-4 (KWP 5BAUD).
Default ECU - engine (id#10 in the headers).
Here are some PIDs supported by tested car:
{
    '03': 'Fuel system status',
    '04': 'Calculated engine load',
    '05': 'Engine coolant temperature',
    '06': 'Short term fuel trim—Bank 1',
    '07': 'Long term fuel trim—Bank 1',
    '0B': 'Intake manifold absolute pressure',
    '0C': 'Engine RPM',
    '0D': 'Vehicle speed',
    '0E': 'Timing advance',
    '0F': 'Intake air temperature',
    '11': 'Throttle position',
    '12': 'Commanded secondary air status',
    '13': 'Oxygen sensors present (in 2 banks)',
    '15': 'Oxygen Sensor 2 A: Voltage B: Short term fuel trim',
    '1C': 'OBD standards this vehicle conforms to',
    '20': 'PIDs supported [21 - 40]',
}
Using CAN2USB devices
Such device is the best option for “car hackers”, since it gives direct access to the OBD-CAN bus on a high speed. I’ve put more info on that here in the cheat-sheet.
Read the vehicle speed with the elm327 and plain C
So let’s say that the goal is to log a vehicle speed from the speedometer, using a linux computer, elm327 controller and a standardized OBD API.
The speed is usually encoded with two-digit hexadecimal number and can vary in range 0…255 km\h.
Configuring a virtual COM-port
Here are some basic serial port parameters for elm327 devices:
- Baudrate - 38400;
- 8 data bits;
- Stop bits - 1;
- No Parity;
Selecting the Serial port Number on Linux:
/dev/ttyUSBx- when using USB to Serial Converter, where x can be 0,1,2…etc;/dev/ttySx- for PC hardware based Serial ports, where x can be 0,1,2…etc;
Remember, that in Linux, everything is a file - so you can apply standard read/write operations on/dev/tty*.
For quick tests, I’ve used screen:
sudo screen -L /dev/ttyUSB0 38400,cs8
After finishing the screen session, the serial port “saves” the last configuration, so it becomes really useful for debugging. To get the last serial port configs for particular device, just run stty:
sudo stty -F /dev/ttyUSB0 -a
Communicating with vehicle through elm327
For the experiment, I’ve wrote a simple program to read vehicle speed and log it to stdout (my apologies, C programmers ;^)).
Here is the pipeline (look to the elm_main.c file and helper functions in obd_helpers.h):
- open serial port file:
int fd; /*File Descriptor*/ char *device_name = "/dev/ttyUSB0"; get_port(&fd, &device_name); - setting up serial port with termios:
size_t vmin = 18; // minimum number of characters for noncanonical read size_t vtime = 2; // blocking read time in deciseconds serial_setup(&fd, vmin, vtime); - configure buffer size and turn-off spaces in response from the elm:
size_t buff_size = 21; // nbytes set_elm(&fd, SET_NO_SPACES, buff_size); - and then run the loop that sends a command to elm and waits for the answer:
char *answer = malloc(buff_size);
printf("\nid,wtime,rtime,dt,bytes_read,data\n");
while (++iter) {
    // clean the buff array
    bzero(answer, buff_size);
    // ask elm for the speed and read result
    tsw = get_time();
    bytes_read = elm_talk(&fd, answer, buff_size, PID_SPEED, 0);
    tsr = get_time();
    dt = tsr - tsw;
    // check that returned answer is really speed
    int check = answer_check(answer, "410D", 4);
    if ( (bytes_read > 0) && check ) {
        speed = get_vehicle_speed(answer);
        printf(msg_speed, iter-1, tsw, tsr, dt, bytes_read, speed);
    }
}
Compile:
gcc -o elm_main elm_main.c
Run, passing the needed device name:
sudo ./elm_main /dev/ttyUSB0
Or run with debug flag to test the connection to the ELM device without a car:
sudo ./elm_main /dev/ttyUSB0 debug
The output of the main script is csv-like formatted and contains timestamps in microseconds, so it’s convenient to dump it to file and analyze later:
sudo ./elm_main /dev/ttyUSB0 > /tmp/elm_speed.csv 2>&1
To monitor the logfile while writing:
tail -f /tmp/elm_speed.csv
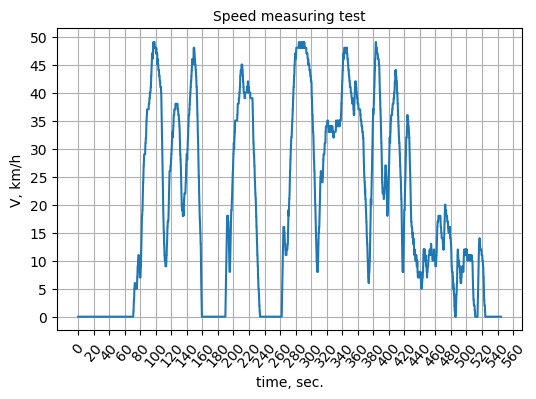
After reading the captured log file we can draw a graph of vehicle’s speed change over time:

voilà
You can do the same trick with any ECU you can find PID for and use that data for your research!