Raspberry PI as a VPN server?
Disclaimer: All content on this blog is intended for educational purposes only. Only you is liable for any consequences resulting from your use of this information. You should always respect laws of your country.
Intro
VPNs are primarily designed to create a secure and encrypted connection between your device and a remote server. This connection can be used to protect online privacy, hide your IP address, access geo-restricted content, and enhance security when connecting to the internet, especially on public Wi-Fi networks.
So the title reflects the core idea - let’s configure our own VPN server without a cloud and stupid subscriptions that constantly drain your money. You pay once - you use it forever (almost).
It comes with the cost of spending some time and money before you can use it:
- buy a computer
- find a place where you can safely mount it and connect to the network
- run the vpn/proxy server on device
- configure access to the device from the internet
Hardware
Let’s start from the hardware part - Raspberry PI looks like a good option, since it’s a powerful mini-computer with all needed interfaces.
The best option to buy it in terms of money - order in China, it’s used 4B with 8Gb of RAM as an example, but you can choose simpler model without Ethernet/USB-A and with 2 Gb RAM - it should serve the needs of a couple users just fine.
I suggest to buy a complete set with the housing and a power unit, like this one.

Assembling
Assembling is usually super-easy:
- place heat sinks from the set on CPU, RAM and network controller
- mount a fan on the top side of housing –> connect it to either 3V or 5V on-board power via GPIO, here is a pinout:
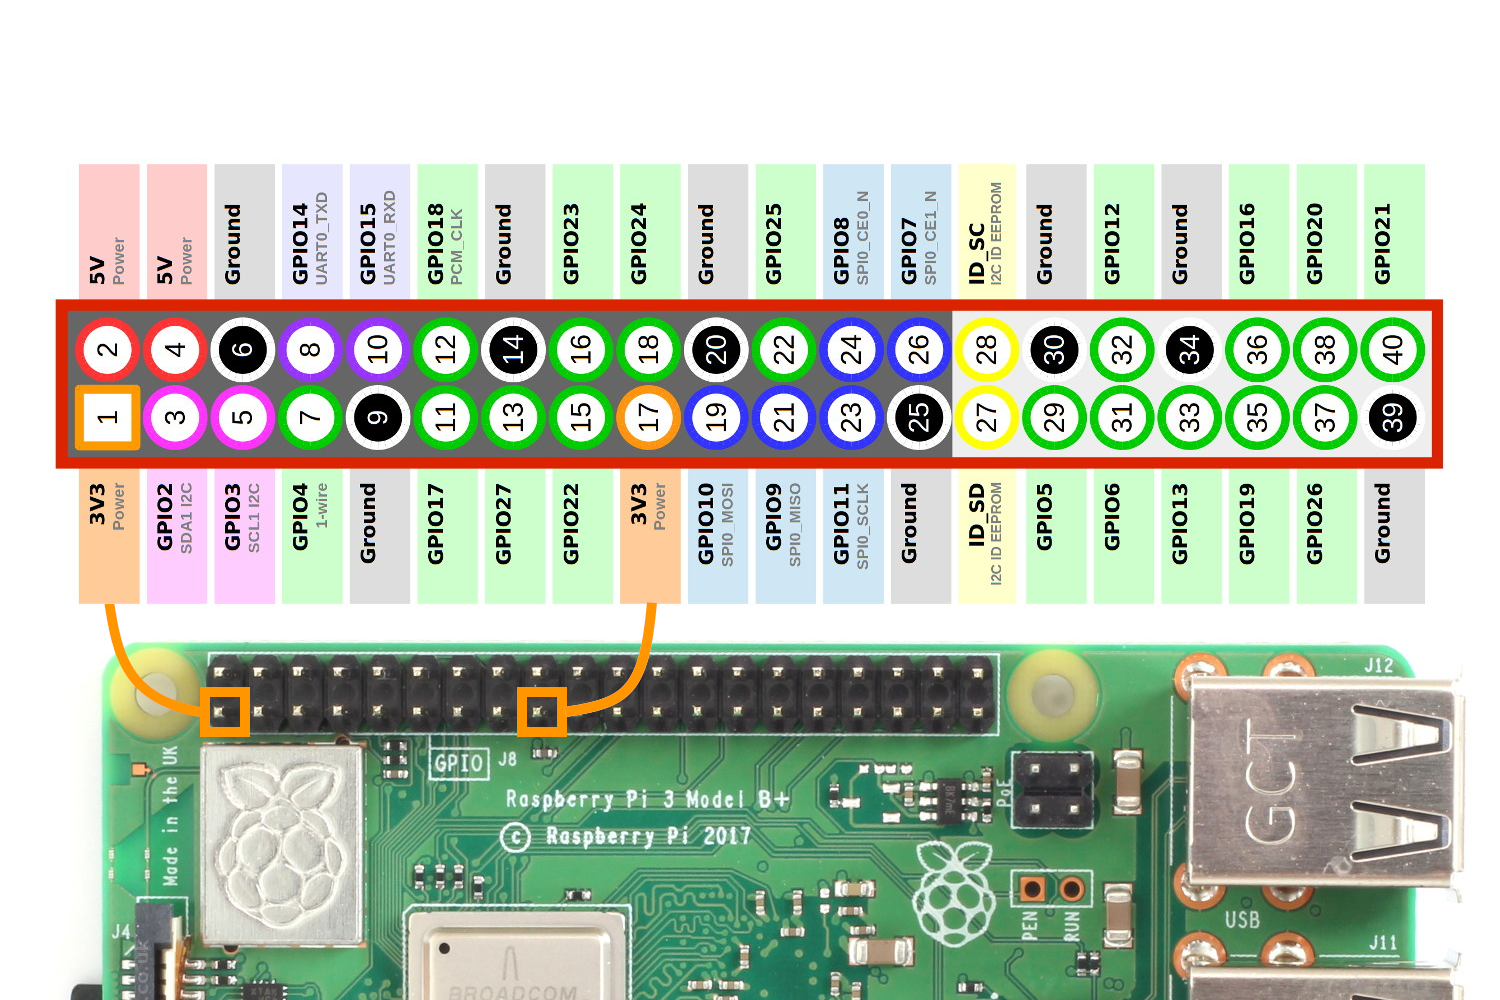
Here is how it looks like assembled:

Raspi configuration
Installing OS:
- use Raspberry PI Imager and install latest available stable release of Ubuntu Server (
Ubuntu server LTS 20.04) –> write the OS image on the micro-sd flash drive - don’t forget to specify your wi-fi and ssh password during the configuration. Alternatively, you can create custom configuration and put it to the boot directory on the SD card, check out this small tutorial.
- mount the SD card into the Raspi and turn on power, then wait a couple of minutes - computer should be ready then
Set-up internet connection:
- from the previous step, your Pi should automatically connect to the wifi after booting. The wpa_supplicant service is managing networks on the device. You can connect to the new wifi network, by creating new
wpa_supplicant.conffile. - connect your Raspi to the router via RG45 (that’s better to use for user’s traffic, because of a large bandwidth), and setup
dhcpclient:sudo dhclient -v- then check that Ethernet interface appeared:
ifconfig - create the cronjob with that command:
sudo crontab -e@reboot dhclient -v
Connecting to Raspi:
- get the Raspi IP by scanning your local network:
- install
nmapif you don’t have it - run:
sudo nmap -sn –script banner 192.168.X.X/24 - the output will show MAC Address of found devices with vendor name. You’re searching for anything related to Raspberry PI. In case you have a lot of Unknown vendors - you can just try to find vendor by MAC address using some service, like https://macvendors.com/
- install
- from the local network, just use
ssh pi@<IP_ADDRESS>and then type previously specified password - move to the public key authentication instead of a password for ssh access:
- generate password-protected ssh keys pair, if you don’t have it yet:
ssh-keygen -o -a 64 -t ed25519 -f ~/.ssh/id_ed255194 - log in to PI and add generated
~/.ssh/id_ed25519.pubto the~/.ssh/authorized_keys - Turn off access by password:
- go to
/etc/ssh/sshd_configfile and change thePasswordAuthenticationtono - reload ssh service:
sudo systemctl restart ssh
- go to
- generate password-protected ssh keys pair, if you don’t have it yet:
- configure public access:
- go to your router’s admin panel (usually sits on
192.168.0.1/192.168.0.0or check your router box) - create port forwarding rule for 22 port (used by default for ssh)
- apply new port forwarding rule
- make sure that you have static IP at the place you want to mount Raspi
- get your routers’ public IP by using some website, like https://www.whatsmyip.org/ - you can use either IP address itself, or DNS, if it exists
- connect to mobile network to test connectivity
- connect to PI:
ssh ip@<PUBLIC_IP or DNS>
- go to your router’s admin panel (usually sits on
- configure firewall on Raspi:
- allow 22 port for ssh access
sudo ufw allow 22/tcp - then enable
ufwif it wasn’t and reboot the device:sudo reboot -h now - connect and check the status:
sudo ufw status
- allow 22 port for ssh access
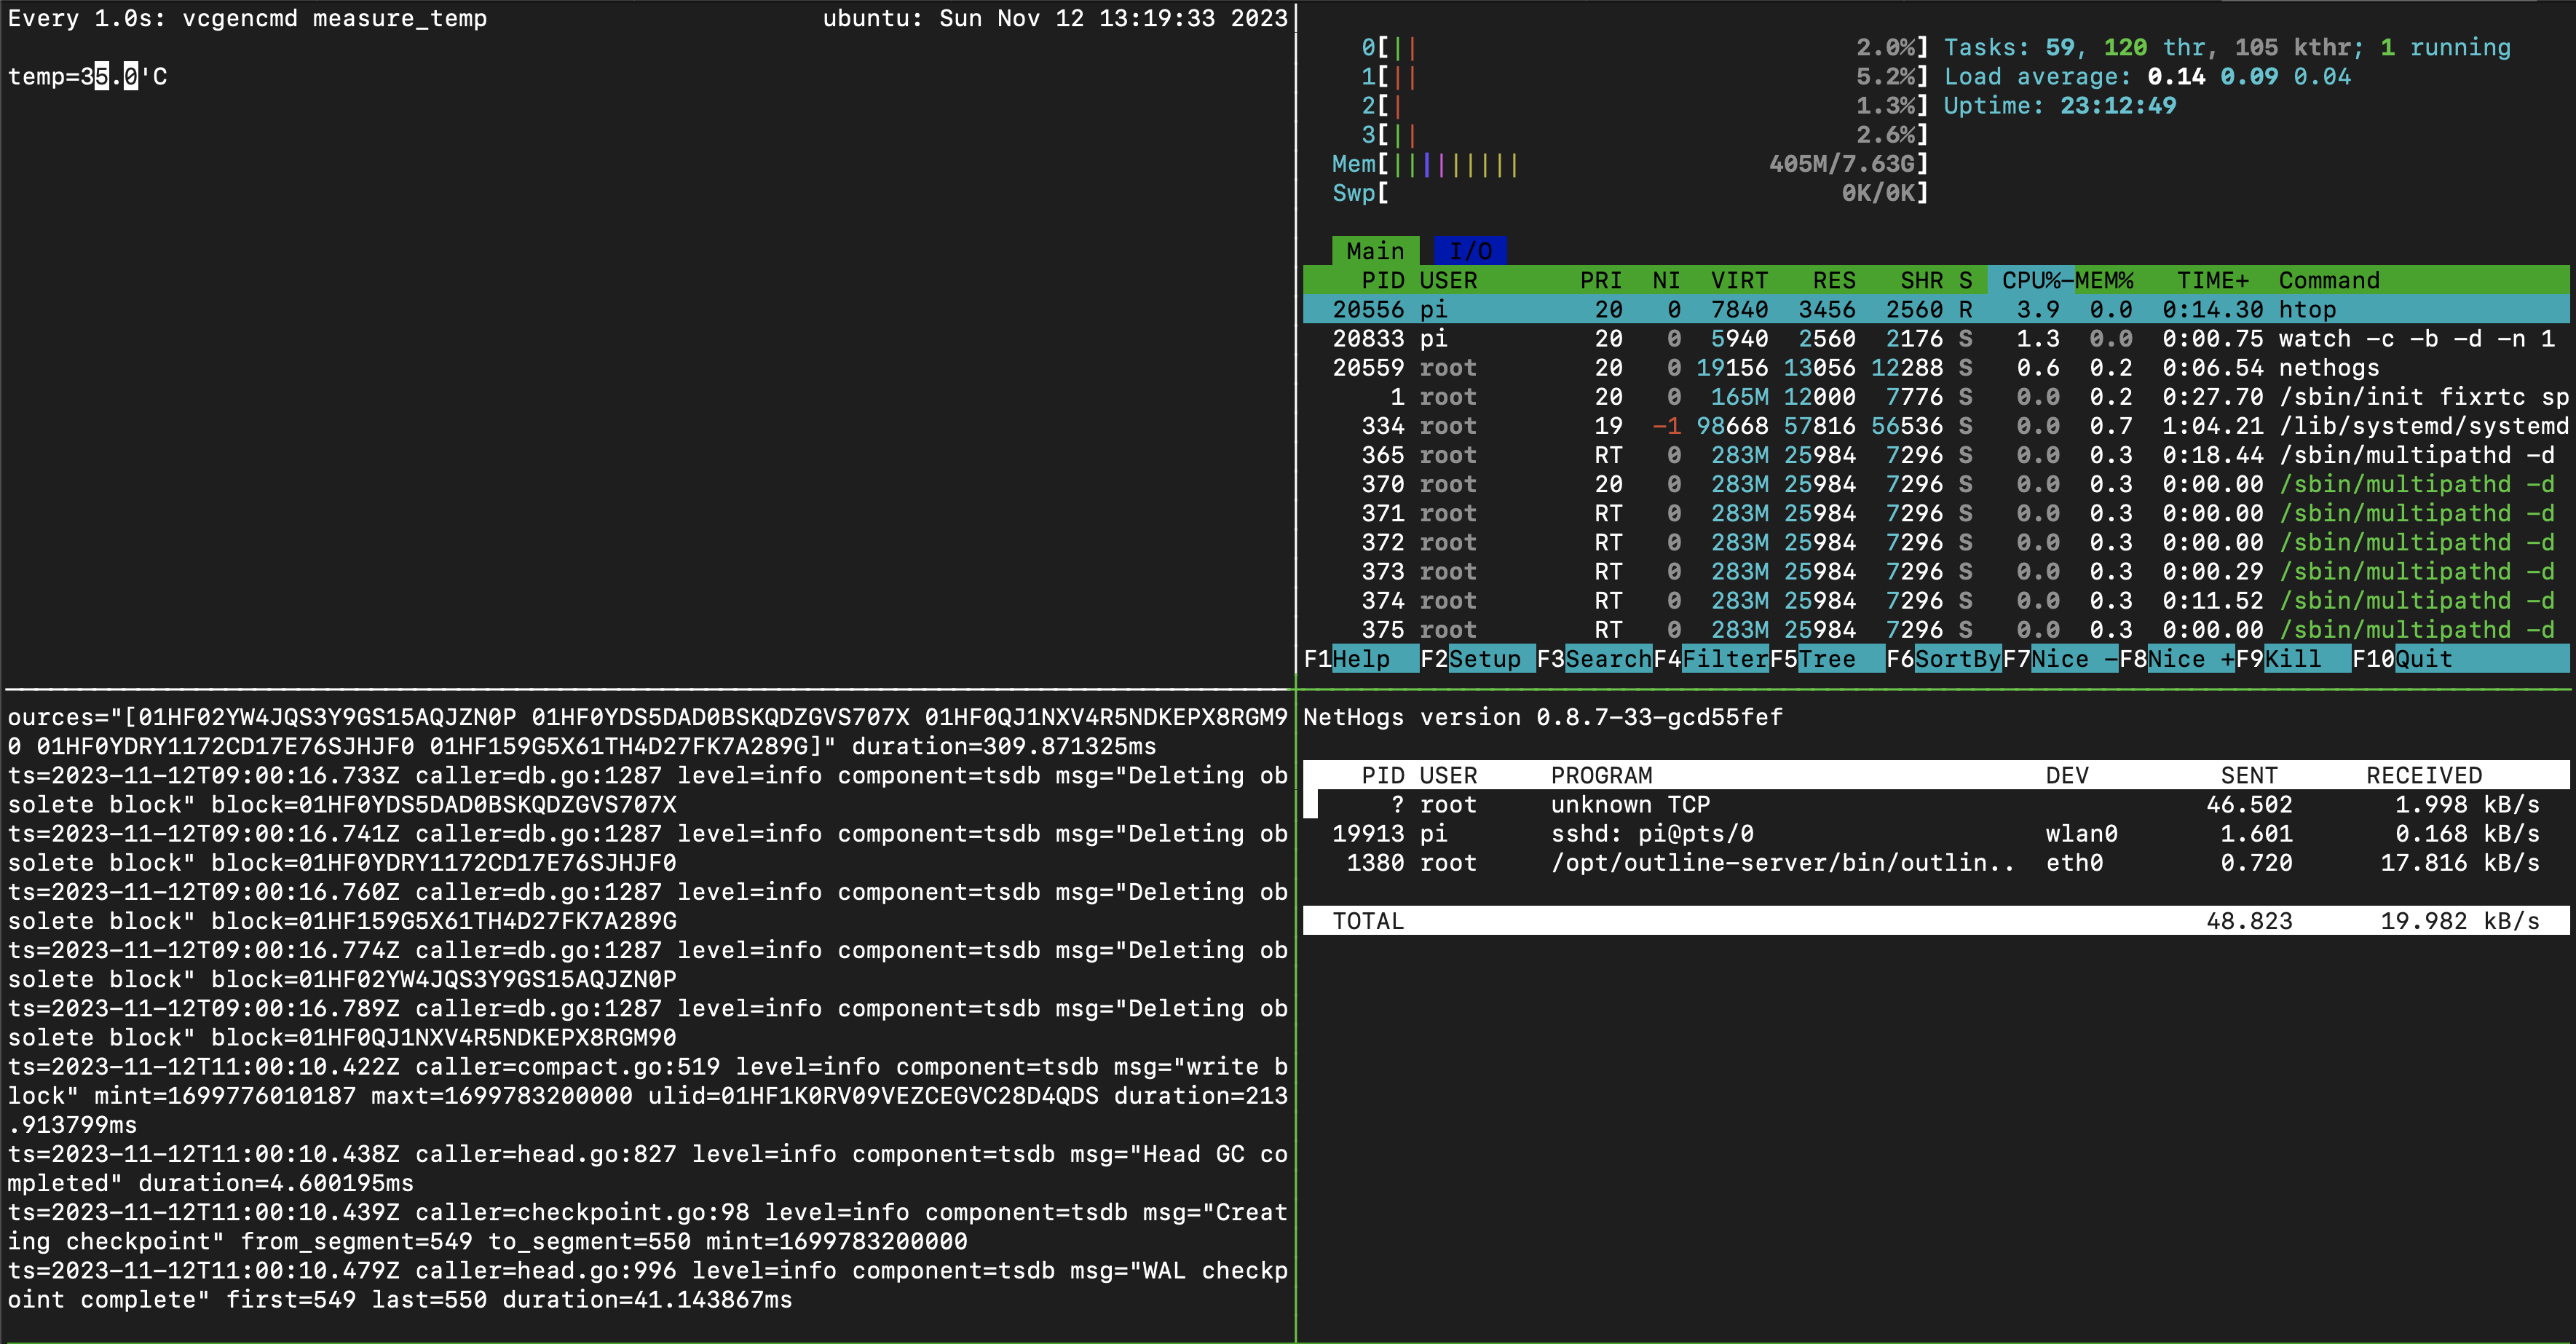
- configure “health monitor” shell session:
-
run tmux session and create 4 windows there to run different apps in each
-
run
htopfor resources consumption monitoring -
run vcgencmd
watch -c -b -d -n 1 – ‘vcgencmd measure_temp’to control the temperature -
install nethogs and run it
sudo nethogs -
follow the last
nlines of the outline server in docker container:docker logs -f -n=100 <CONTAINER_ID> -
your screen in the end will look smth like this:
-
VPN
The problem is that nowadays it’s pretty easy to sniff the traffic with dpi technologies, detect packets of the popular VPN protocols and block them.
The general solution is to built a proxy based on protocol like Shadowsocks, which is designed to be hard to detect, to bypassing firewalls and add traffic encryption on top.
We will be considering two solutions proven to be reliable: outline and v2ray (strictly speaking they’re two different things, but it will be a bit explained later).
Outline (easy, fast, default way)
Outline is a set of applications developed by Jigsaw (a subsidiary of Alphabet Inc., which is also the parent company of Google) that allows to set up VPN servers.
Outline uses the Shadowsocks protocol for communication between the client and server. Traffic is encrypted with the IETF ChaCha20 stream cipher and authenticated with the IETF Poly1305 authenticator.
The main con is that it’s super easy to configure and use out of the box.
Setting up:
- install docker: https://docs.docker.com/engine/install/ubuntu/
- now, we need to use
arm-based outline server image, I’ve used slightly outdated one, which could be found by this link. It just uses several binaries that compiled for thearmplatform and appropriate node docker image. You just need to execute install shell script in order to run the server - allow outline-specific ports in
ufw:14393- both tcp and udp,60866- tcp - configure port forwarding on the router, like you did previously for ssh:
14393- both tcp and udp,60866- tcp - go to your desktop machine and run the Outline manager to generate access keys:
- clone the repo that you used to run outline server
- install node if you don’t have it, presumably via nvm
npm installin the root of the reponpm run action server_manager/electron_app/start ${PLATFORM}wherePLATFORMislinux/macos/windows- generate keys through the UI and share with others! Depending on platform you just need to install the outline client and you’re ready to go (mac/ios, android, win/linux)

V2Ray (flexible, lower-level, less user-friendly, don’t use if Outline is enough)
V2Ray is an open-source proxy software project that was developed primarily to improve upon the shortcomings of other proxy protocols and provide advanced features for secure and efficient internet communication. So it rather should be compared with Shadowsocks protocol itself and called it’s successor (after the original Shadowsocks has been removed from the internet by the call from the government), rather than higher-level vpn/proxy solutions like Outline.
It is highly configurable (which is not always good, lol) and uses low to none of external dependencies - just pure go, which simplifies configuration of the environment (static binary and we’re ready to go). Also, one of the disadvantages is that the default protocol vmess by default is a TCP-based stream protocol, which for UDP means –> “UDP over TCP”.
Let’s configure vmess:
- use the following utility script to install the server:
curl -L https://raw.githubusercontent.com/v2fly/fhs-install-v2ray/master/install-release.sh | sudo bashcurl -L https://raw.githubusercontent.com/v2fly/fhs-install-v2ray/master/install-dat-release.sh | sudo bash
- enable and start v2ray service
sudo systemctl enable v2ray; sudo systemctl start v2ray - check if all good
sudo systemctl status v2ray - for the proxy configuration (both client and server), I suggest to use the following tutorial:
- edit the server config:
sudo vi /usr/local/etc/v2ray/config.json:- generate the regular uuid, which is used as a “password”, in the following form
a82d8737-18b8-4f91-81ca-7d69b8f74003
- generate the regular uuid, which is used as a “password”, in the following form
- restart v2ray
sudo systemctl restart v2ray
- edit the server config:
- allow v2ray port from the config in firewall:
sudo ufw allow 10086and check statussudo ufw status - configure port forwarding on your router for port
10086(tcp) - watch for
v2raylogs:sudo tail -f /var/log/v2ray/error.log - download client (ios, android) and copy there earlier created client config
Enjoy!